
Matrix Cryptographic Key Infrastructure
Posted
on
in
Matrix, Programming
• 2983 words
• 15 minute read
Tags:
Cryptography, E2EE, Encryption, Security, Identity, Verification
This is a companion article to the talk I gave at the 2024 Matrix Conference by the same name.
End-to-end encryption is one of the things which brought me to Matrix, and I’m sure that it’s one of the factors that brought many of you to Matrix as well.
However, Matrix’s user experience with cryptography is often confusing. I mainly blame the other chat networks for their incompetence. Most other chat networks don’t even provide any cryptographically-guaranteed security and privacy. Of the ones that do, most do so in a way that does not truly leave the user in control of their keys. Only a few networks, namely Signal, truly leave the user in control, and their UX is arguably worse than Matrix.
In this article, my goal is to discuss the cryptographic key infrastructure in Matrix. What do I mean by “infrastructure”? I mean all of the features which support key sharing and identity verification, but don’t actually themselves provide security. You can think of this article as discussing the “UX layer of cryptography in Matrix”. None of the things that I’m going to discuss are strictly necessary for ensuring secure E2EE communication, but without them, Matrix’ UX would be horrible.
Let’s first discuss what Matrix even uses cryptography for. There are two main purposes:
Message Security — only the people who are part of the conversation should be allowed to view messages of the conversation.
As an additional benefit of how Matrix achieves this, encrypted messages cannot be tampered with by a man-in-the-middle actor without the receiving party knowing.
Identity — verifying that a user or device is who they say they are.
Note that one of the most important parts of identity this is verifying that our own devices are under our own control and we should allow our own clients to share keys to it.
We will look at how it accomplishes both of these goals and the infrastructure required to move the necessary keys around.
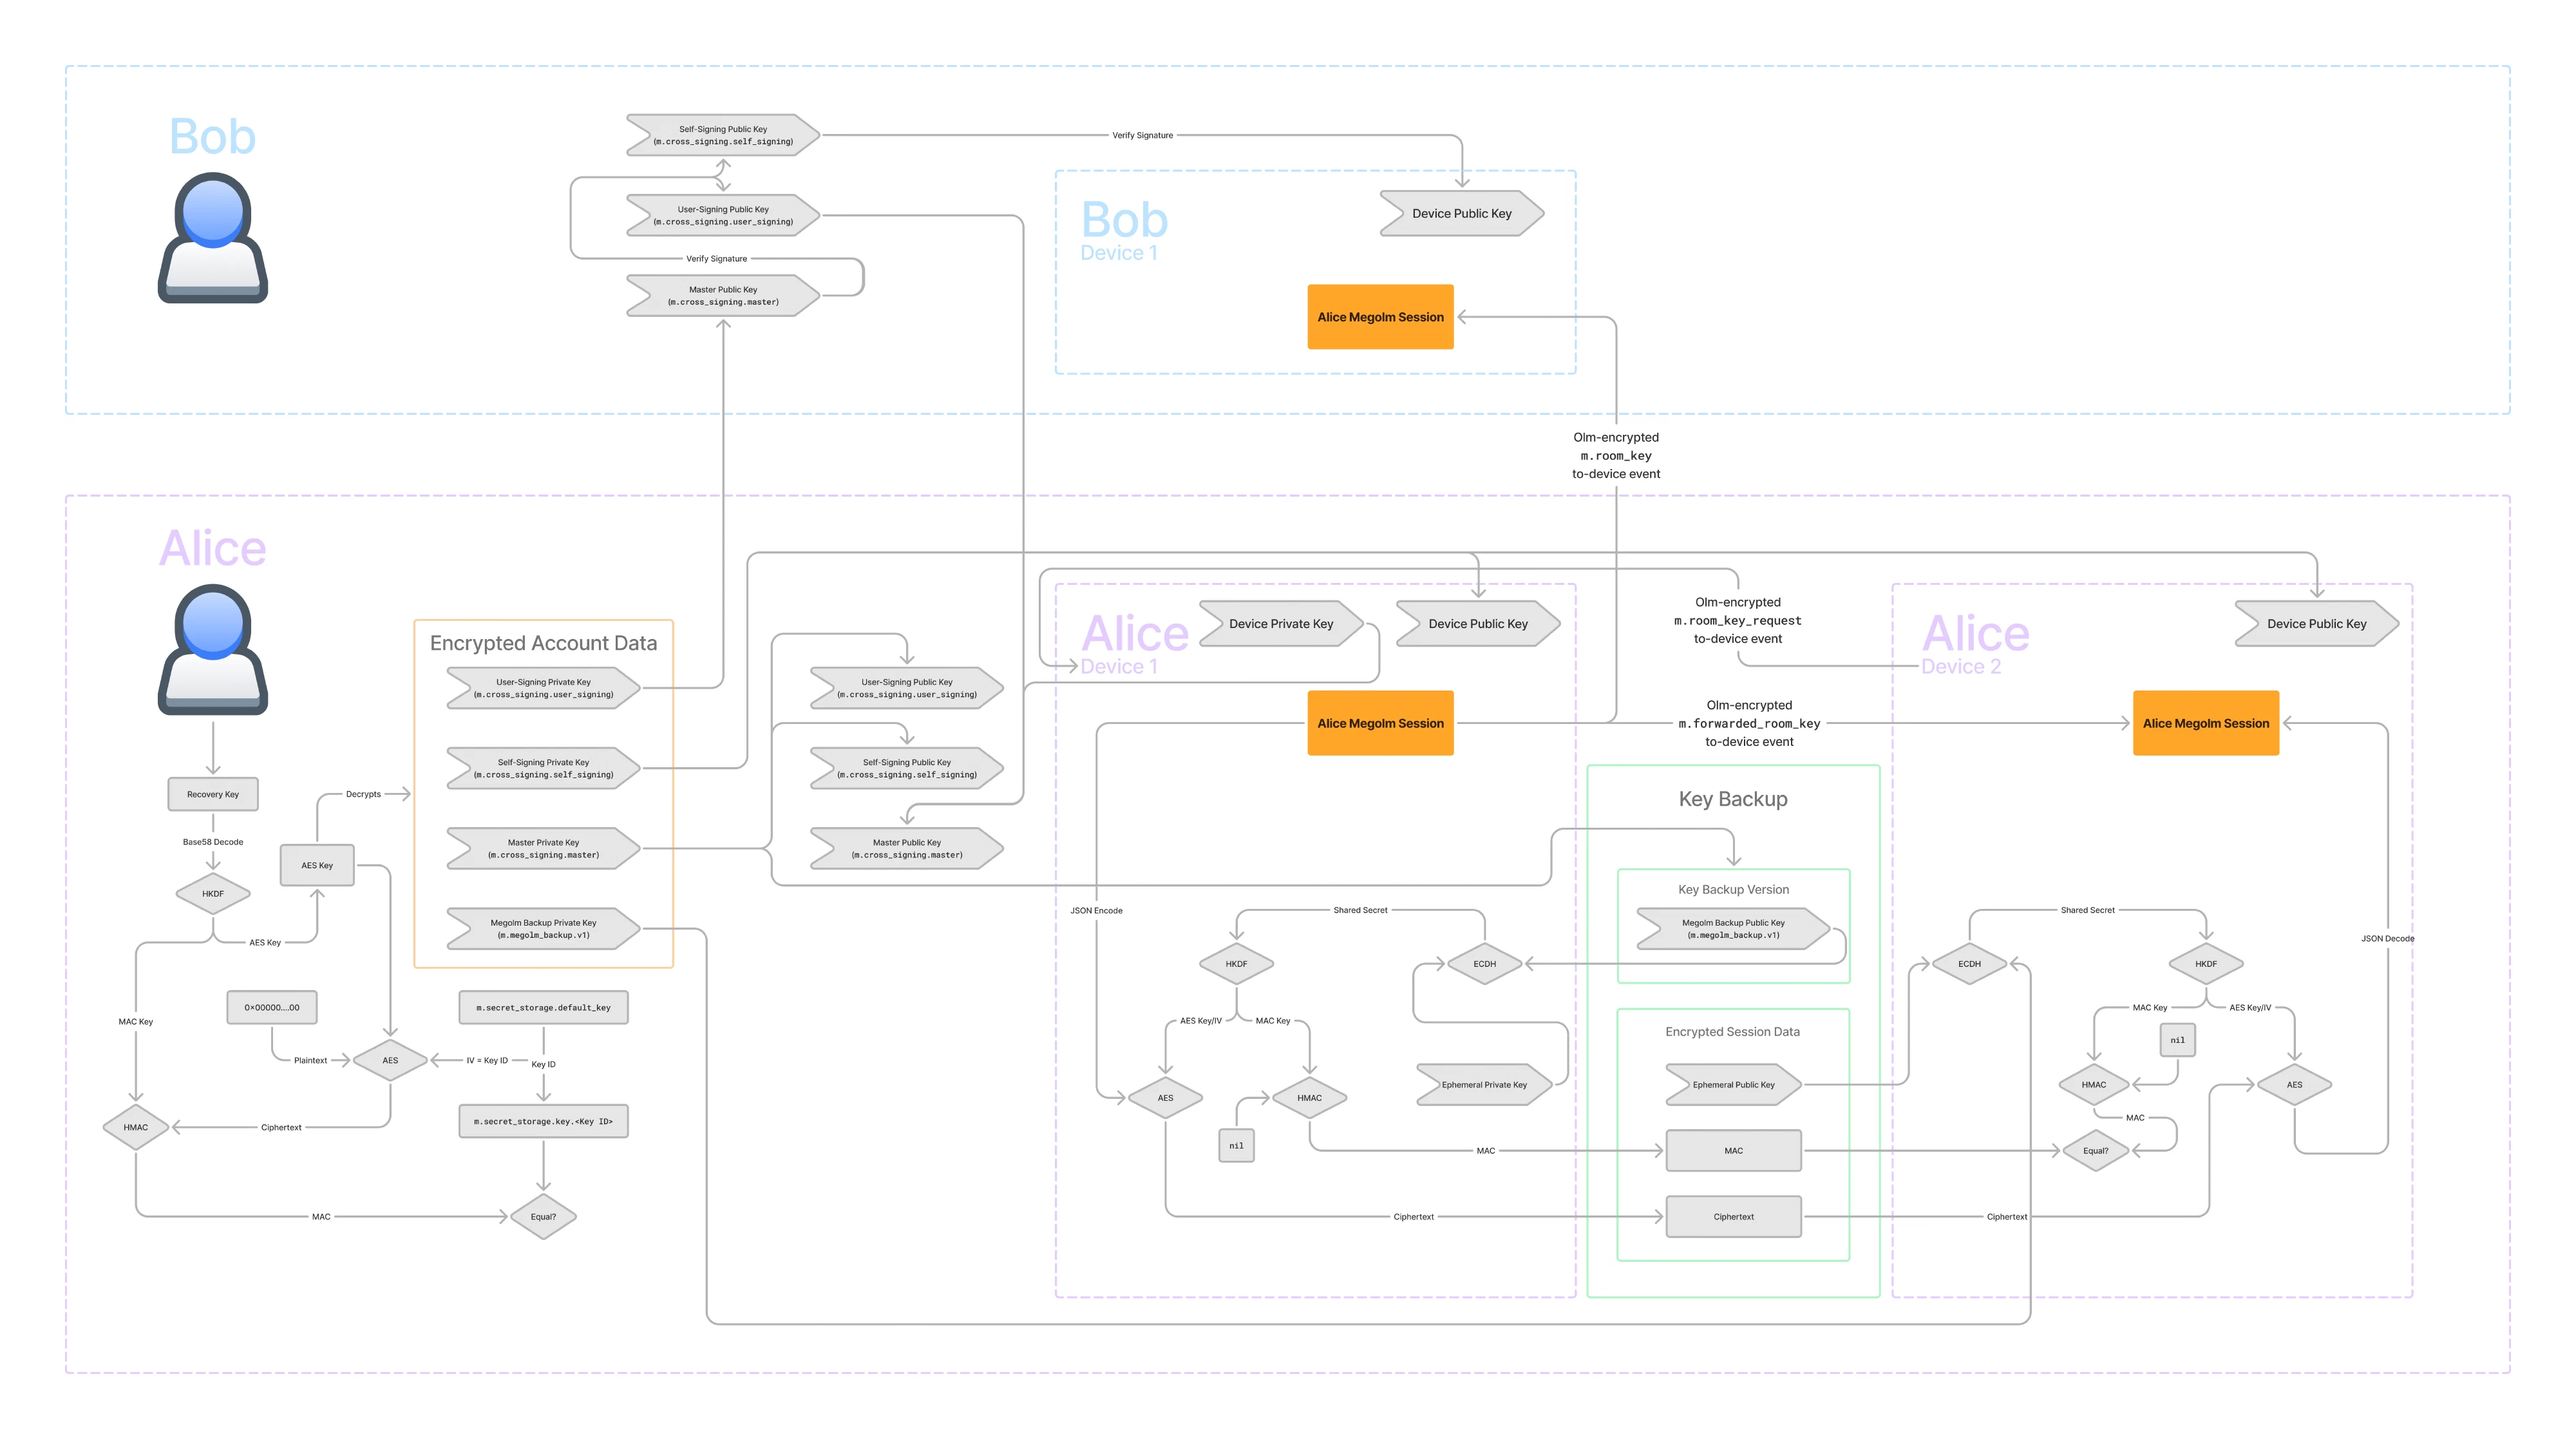
Big Picture
In this article, we will be exploring the following diagram. It shows how those core features are implemented as well as the infrastructure that supports them.

I know, it’s pretty overwhelming. But don’t worry, we are going to go step-by-step through this, at the end of the article you should have an understanding of what each part of this diagram means.
Let’s start by orienting ourselves to the big picture of this diagram, then we will break down the diagram into manageable pieces.
You can see that there are two users represented in the diagram: Bob on the top and Alice on the bottom. The diagram is focused on how the Megolm session created by Alice’s Device 1 is shared to Bob and to Alice’s Device 2.
You’ll also notice that the diagram is color-coded.
- Red nodes represent data that does not leave the device.
- Green nodes represent data is public and can be shared with the server and other users.
- Orange nodes represent data that can be shared with trusted parties, or with members of the same Matrix room.
- Blue and purple nodes represent cryptographic operations.
Message Security
It’s important that we don’t loose sight of the reason for all of this infrastructure. Highlighted in orange within each of the devices, we have the core of Matrix security: the Megolm session.
We aren’t going to discuss this in detail today. I wrote a full article about Megolm if you want to learn more. For the purposes of this article, the only thing you need to know about the Megolm session is that it’s what is used to encrypt and decrypt messages. The Megolm session needs to be shared with all the devices that Alice wants to be able to read her messages. So it needs to be shared to the devices of other users in the Matrix room (in this case Bob) as well as her other devices.
All of the rest of the infrastructure in this diagram is to facilitate transferring that Megolm session, or verifying that a device should in fact have access to that Megolm session.
Identity
Next let’s discuss identity. The highlighted parts of the diagram provide a cryptographic way to verify that a device belongs to a particular user.
There are actually two pieces here: determining trust for our own user and determining trust for other users. We will look at each of these in more depth later.
The Other Stuff
So what is all of the other stuff? That is the infrastructure for sharing the Megolm session around to other devices and users. There are arrows representing Olm-encrypted to-device messages going between devices. The lower-right section of the diagram represents key backup which allows you to backup your keys to the server and restore from your other devices. Then, on the left we have the infrastructure necessary for storing secrets on the server encrypted by a recovery code.
At this point, we are ready to embark on our journey of understanding each piece of the diagram.
This article requires some basic understanding of the following cryptography concepts:
- Encryption (symmetric and asymmetric)
- Asymmetric signatures
- Hashes and HMAC
- Key-Derivation Functions (HKDF)
- Diffie-Hellman Key Exchanges
If you are unfamiliar with any of these topics, check out the Matrix Cryptography Prerequisites companion article which describes the prerequisites in enough detail to understand the rest of this article.
Sharing Keys
We’re going to start by discussing how we get keys from one device to another. This process is generally called “key sharing”.
Remember, what the key that we want to share is the Megolm key. That’s what encrypts the messages. There are two ways to share these: encrypted olm events and key backup.
Encrypted Olm Events
In the following diagram, I got rid of everything besides the Megolm session and the encrypted Olm events which are highlighted in red. The events are sent as to-device messages which allow you to send messages to specific devices (rather than to rooms).
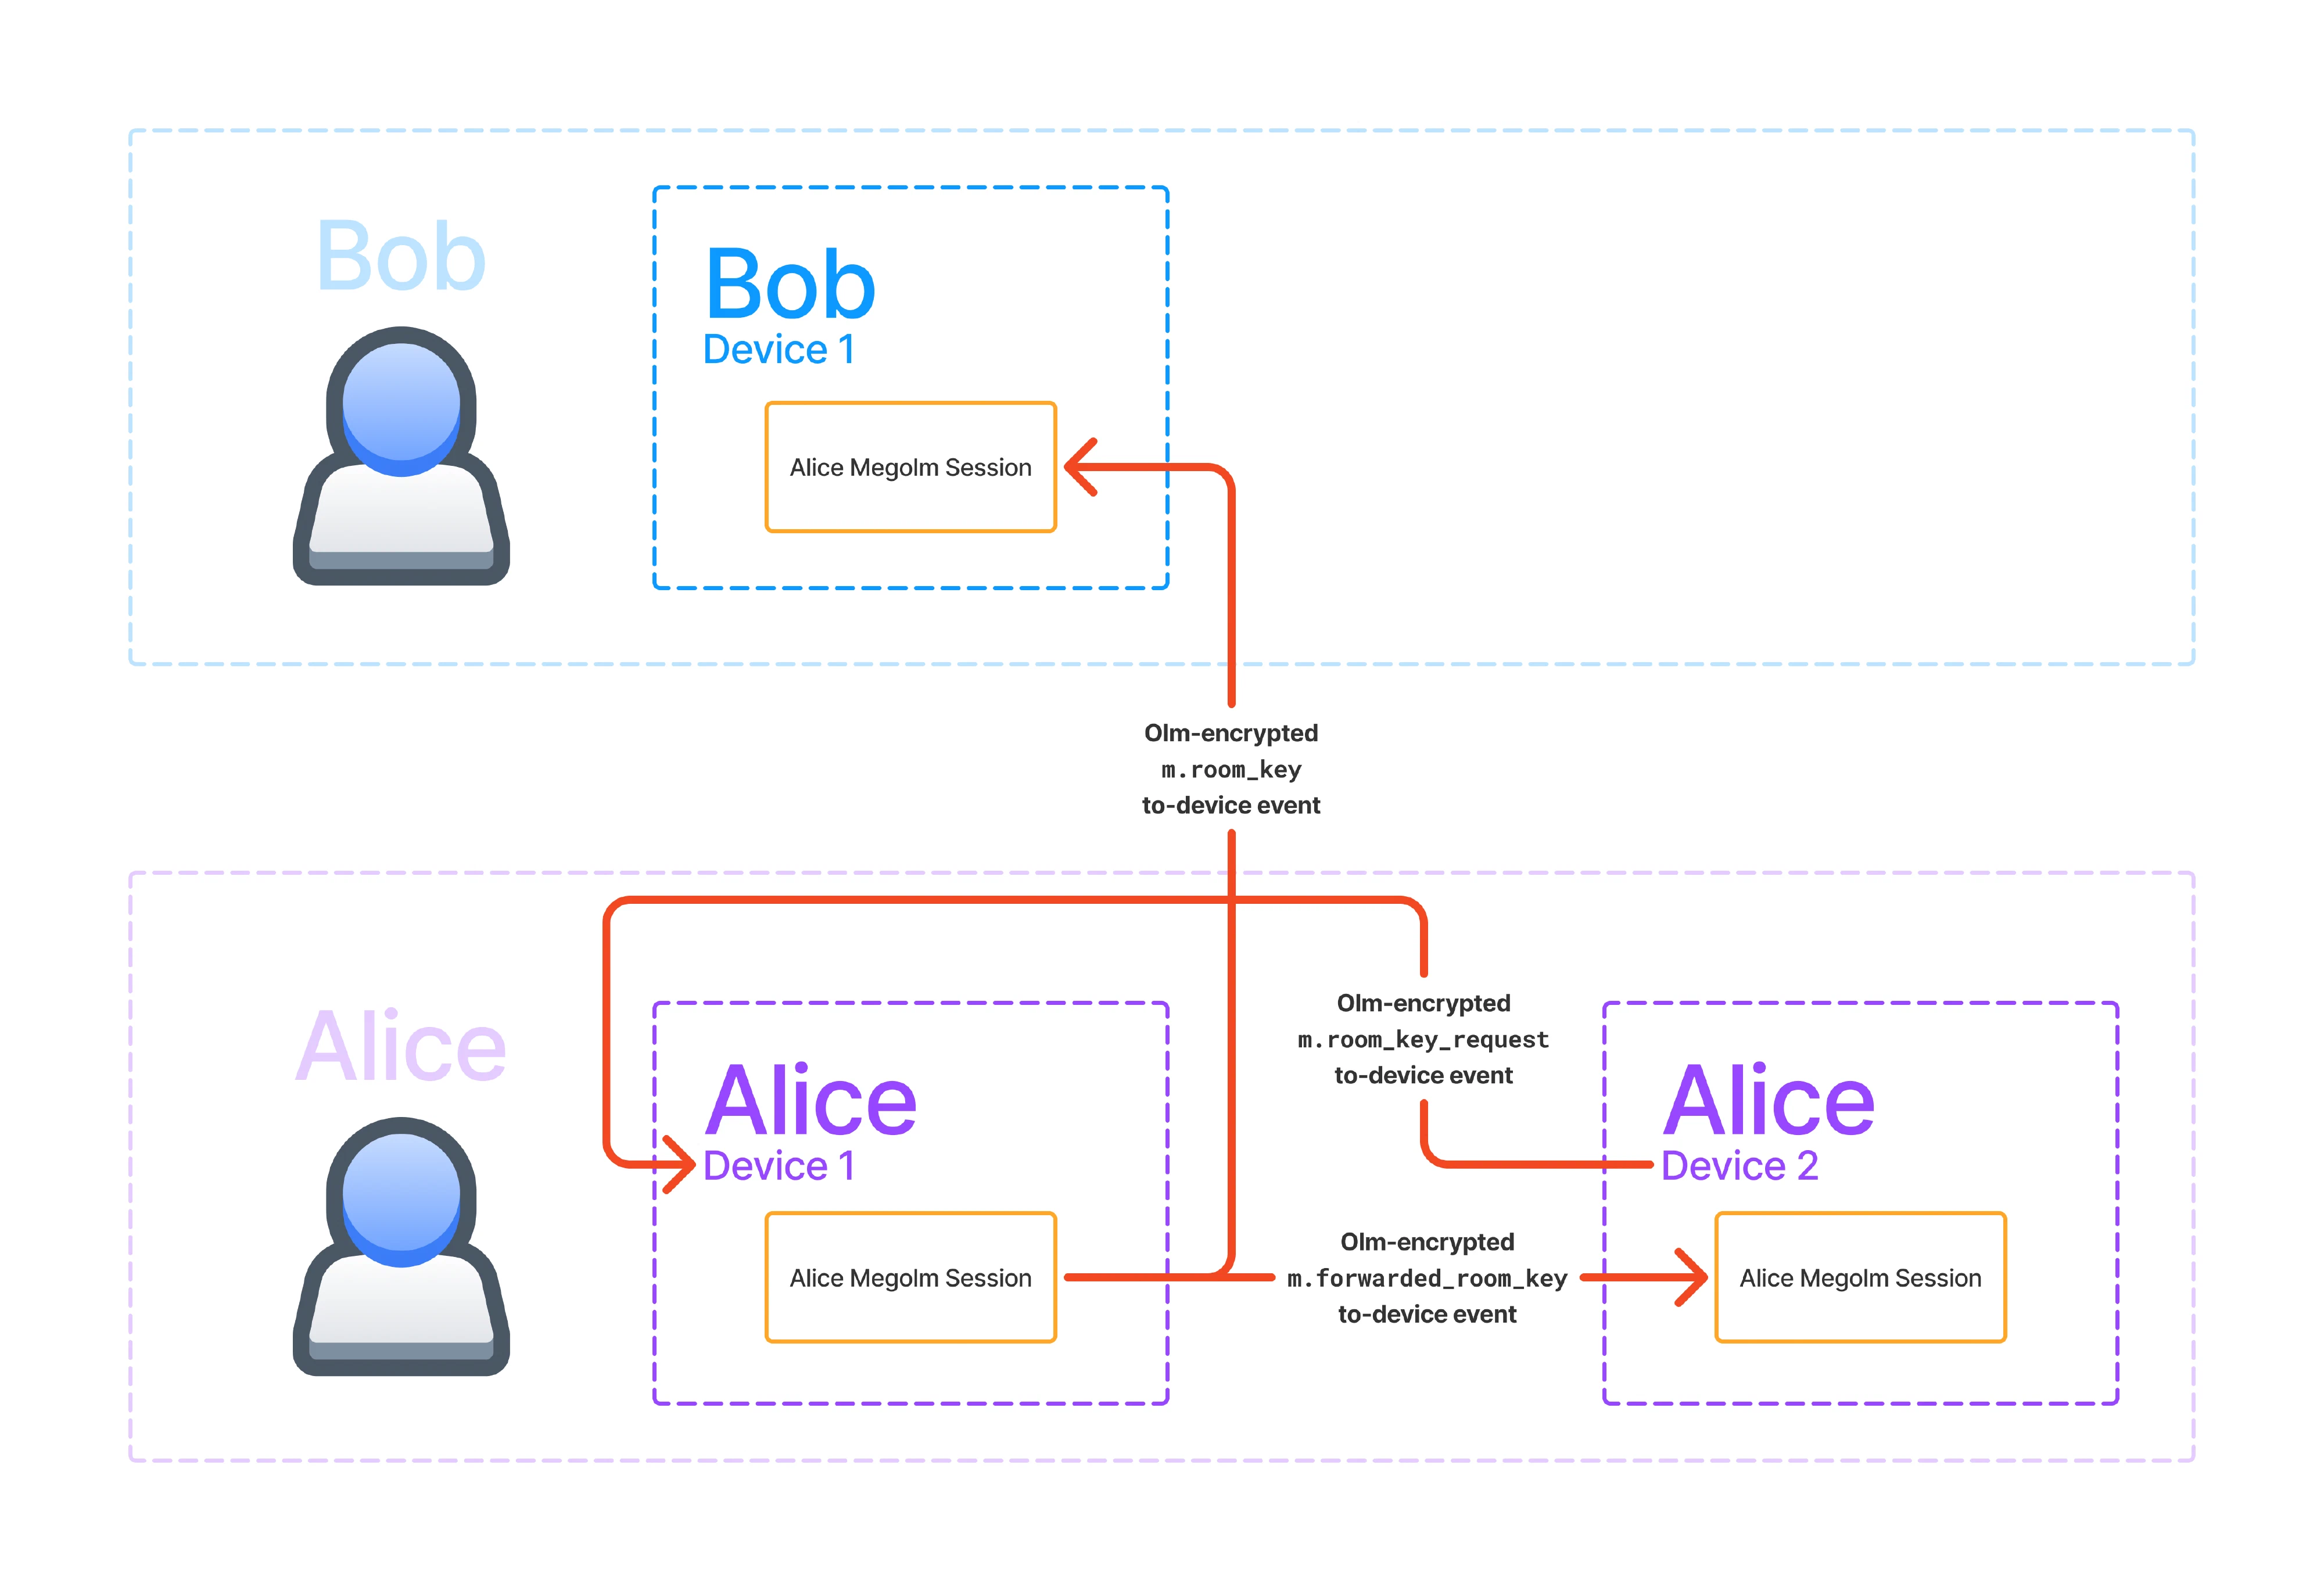
You can see that we can send keys to other users’ devices via m.room_key
events. We actually we use m.room_key events to send keys to our own devices
as well. We can also request keys by sending m.room_key_request events to our
own verified devices and the other devices can respond using
m.forwarded_room_key events. We will discuss about how we know a device is
verified later.
I’m not going to discuss how Olm encryption works. It’s already been covered many times since it’s basically just the Signal double-ratchet algorithm. For our purposes, it’s sufficient to know that we can send keys securely to other users’ devices and our own devices via these events.
This seems great, why do we have anything else? Well, new logins are the issue. Say Alice just logged in on Device 2 and finished verification.
If Device 1 is online, she can send key requests to Device 1 and Device 1 can respond. This works, but there will likely be a lot of keys to request. Every user in every encrypted room has different keys. This will make Device 1 do a lot of work to send back all the keys. On mobile devices, keysharing can’t really be done in the background, especially on iOS. Even on desktop devices, it’s still a lot of work to process a flood of key requests.
But it’s even worse if Device 1 is offline. In that case, Alice’s key requests will never be answered!
This is where key backup comes into play. Key backup allows us to store keys on the server, and restore them from our other devices even if your other devices are offline or inaccessible.
Key Backup
In the following diagram, I got rid of everything not related to key backup.
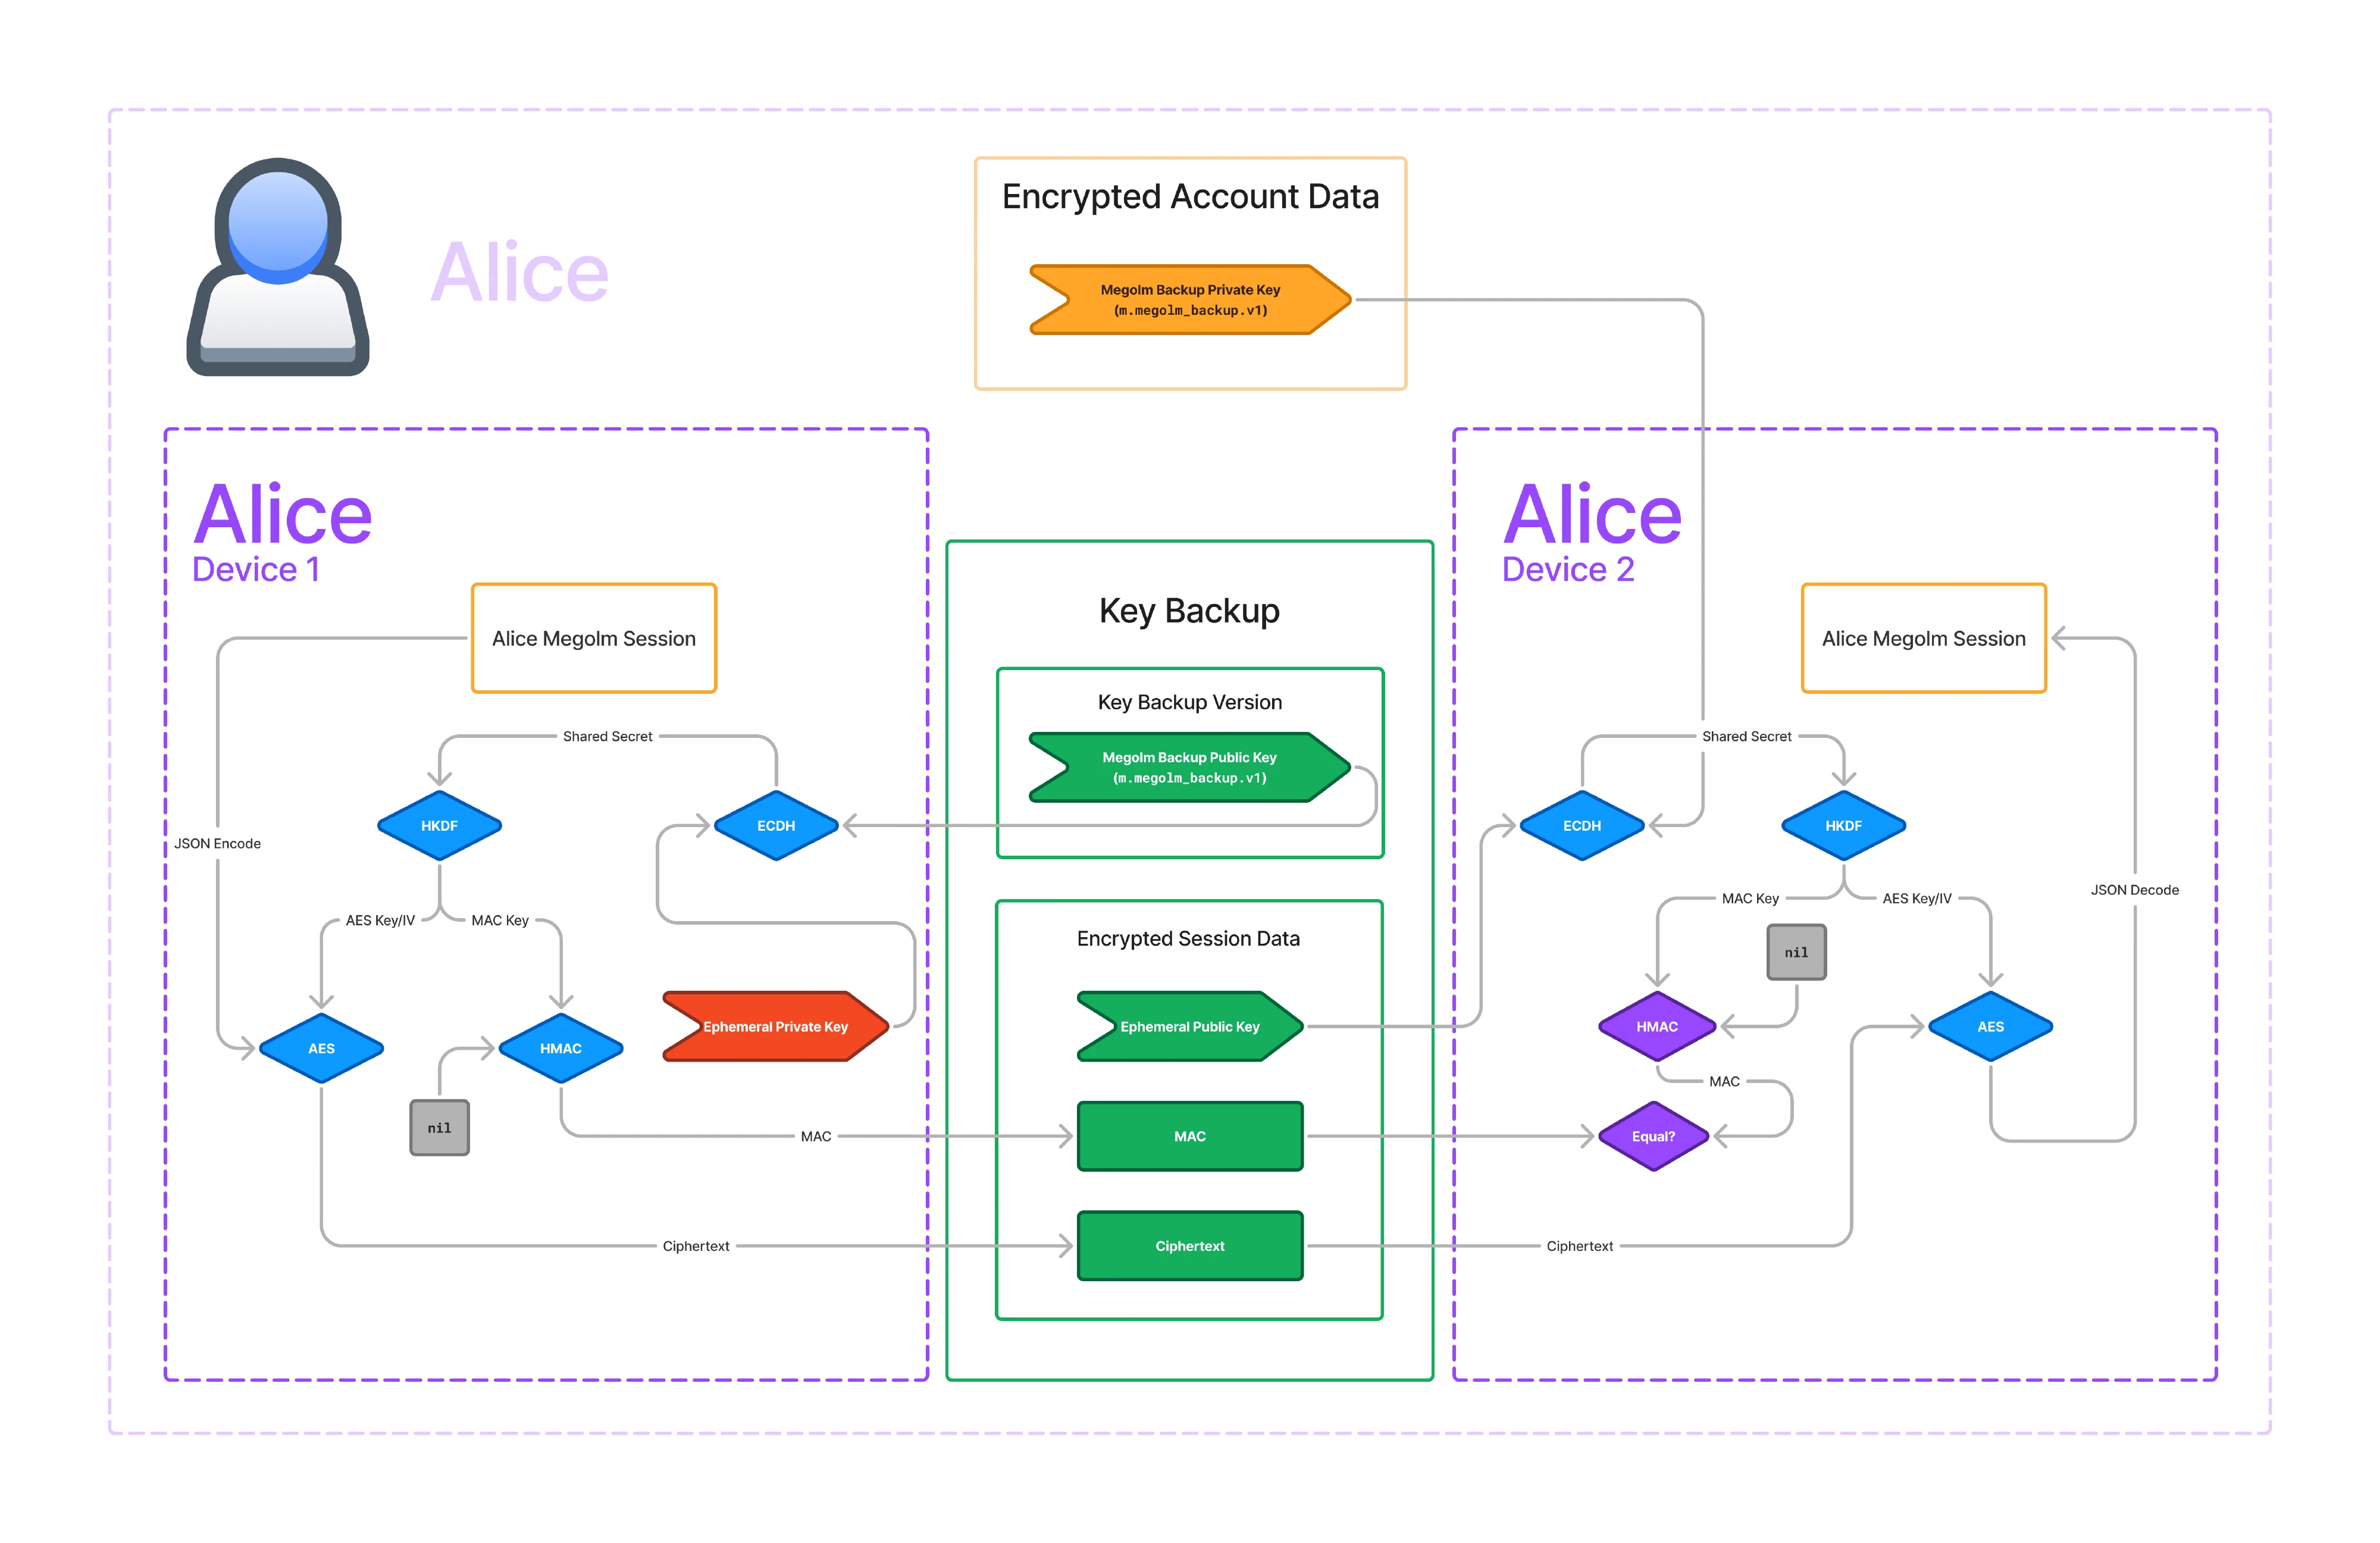
In the middle we have the key backup in green. Key backup is stored on the server. In this diagram, we’re trying to get the Megolm key from Alice’s Device 1 to her Device 2, so left to right.
There are two pieces to key backup: the key backup version which includes the backup public key and the encrypted session data for each of the backed-up Megolm sessions.
The first thing to note is that AES is used on both sides to encrypt and decrypt the Megolm session. Only the encrypted version is stored on the server. But AES needs a key and initial vector. Where do we get those from? Well, we get them from HKDF. HKDF requires a key as well, so where do we get that from? That comes from a call to ECDH.
Note that everything so far is the same on both the encrypting and decrypting sides!
Recall that ECDH requires a private key, and the other keypair’s public key. If you have either private key, we just need the other public key to get the same value from ECDH.
\[\textbf{ECDH}(A_{private}, B_{public}) = \textbf{ECDH}(B_{private}, A_{public}) = K_{shared} \]So where do we get the \(A\) and \(B\) keypairs from?
- The first keypair is the Megolm backup keypair. The public key is stored in the key backup version. The private key is a secret stored on the user’s device.
- The second keypair is the ephemeral keypair. A new keypair gets created for each backed up session. It’s ephemeral because the private part is be discarded immediately after the encryption is done. The public key is stored in the encrypted session data.
This is where the sides diverge.
- The encrypting side gets its private key from the ephemeral keypair and it uses the Megolm backup public key as its public key.
- The decrypting side gets its private key from the Megolm backup private key and it uses the ephemeral public key as its public key.
Critically you must have the Megolm backup private key to decrypt the key backup.
For each Megolm session that we back up in key backup, we store the ephemeral public key and the ciphertext from AES together in the encrypted session data object. But there’s another item that we store in this object: the MAC.
MACs are meant to ensure that the ciphertext hasn’t been tampered with by a malicious or incompetent party. We use HMAC to generate the MAC to avoid metadata attacks. Recall that HMAC requires a key. Conveniently, we are already using HKDF to generate the AES key and initial vector, so we can just use the same key derivation to get the HMAC key as well.
What should happen is that we pass the ciphertext into HMAC. However, the original implementation in libolm failed to do this correctly and instead just passed an empty buffer, and it has been de-facto spec ever since.1
So, the MAC is not really useful at all in its current state. I’m hoping that a future version of the spec fixes this.
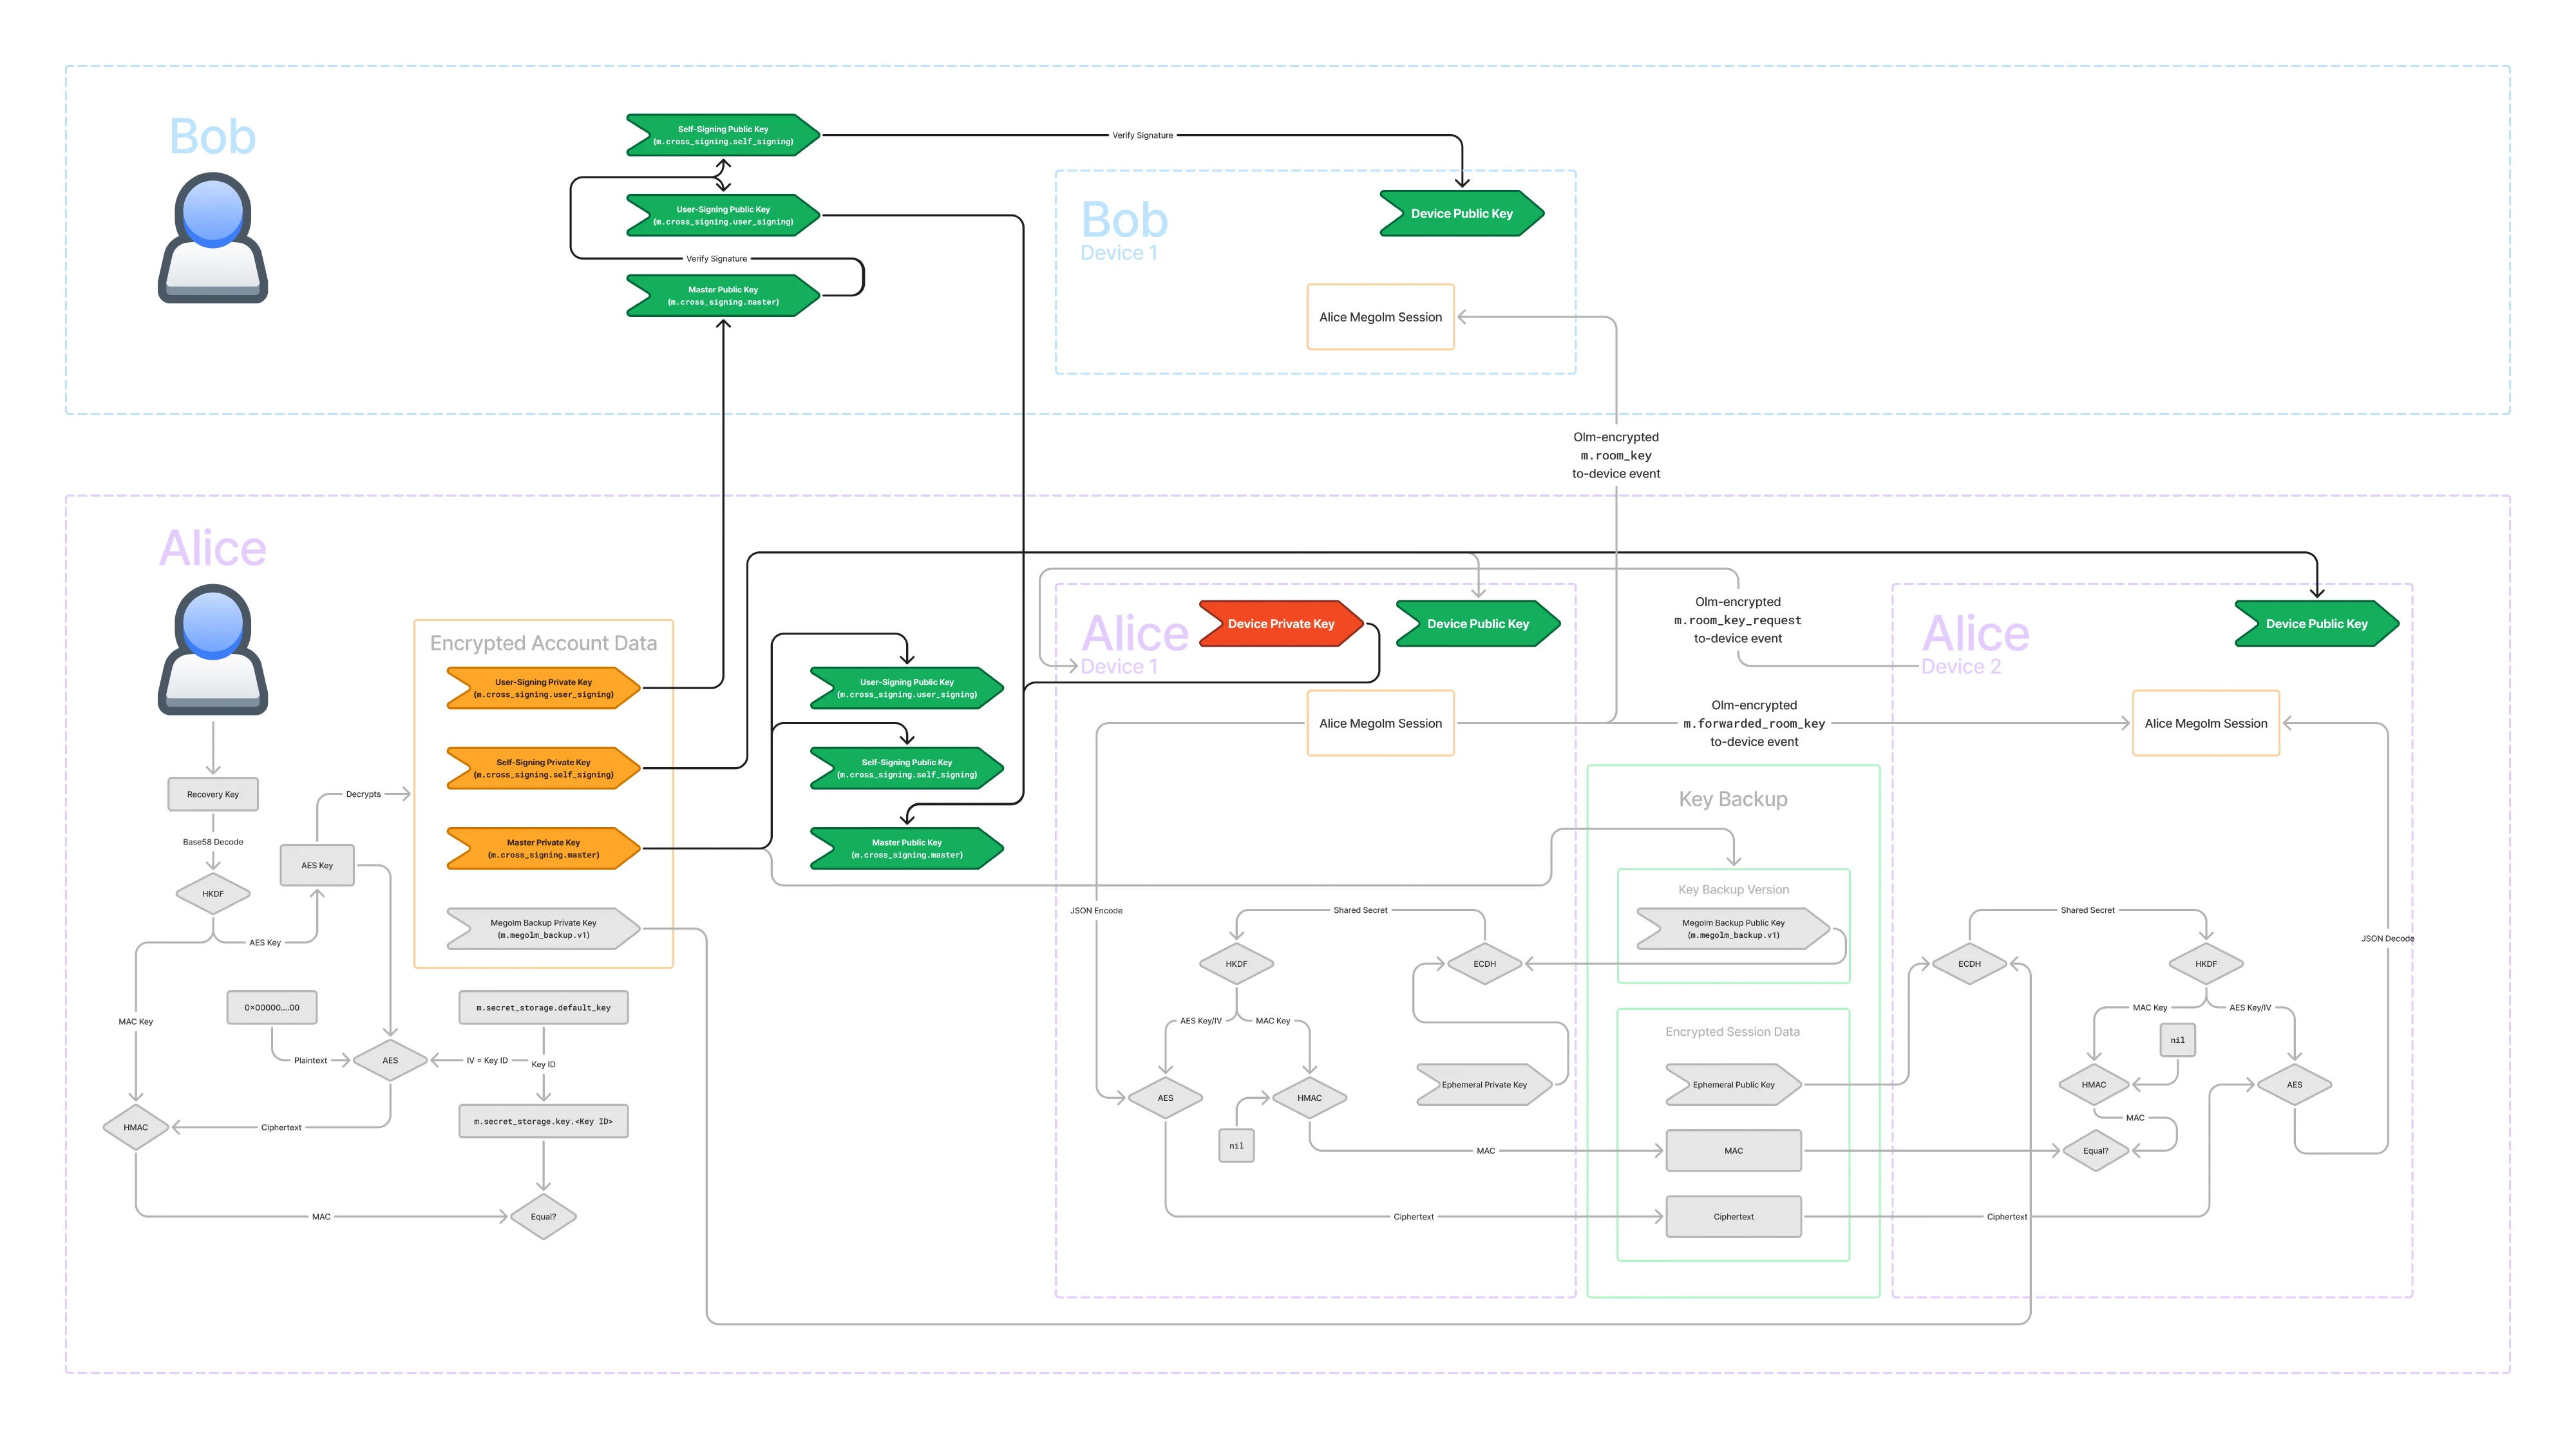
Device Verification
Recall how I said in Encrypted Olm Events that we only want to forward keys to our own verified devices? Now we are going to discuss how verification status is determined.
The answer is signatures! Remember that asymmetric signatures can only be created by the private key, and anyone who possesses the public key can verify the signature. In the following diagram, I’ve highlighted all of the signatures required for verifying your own devices.
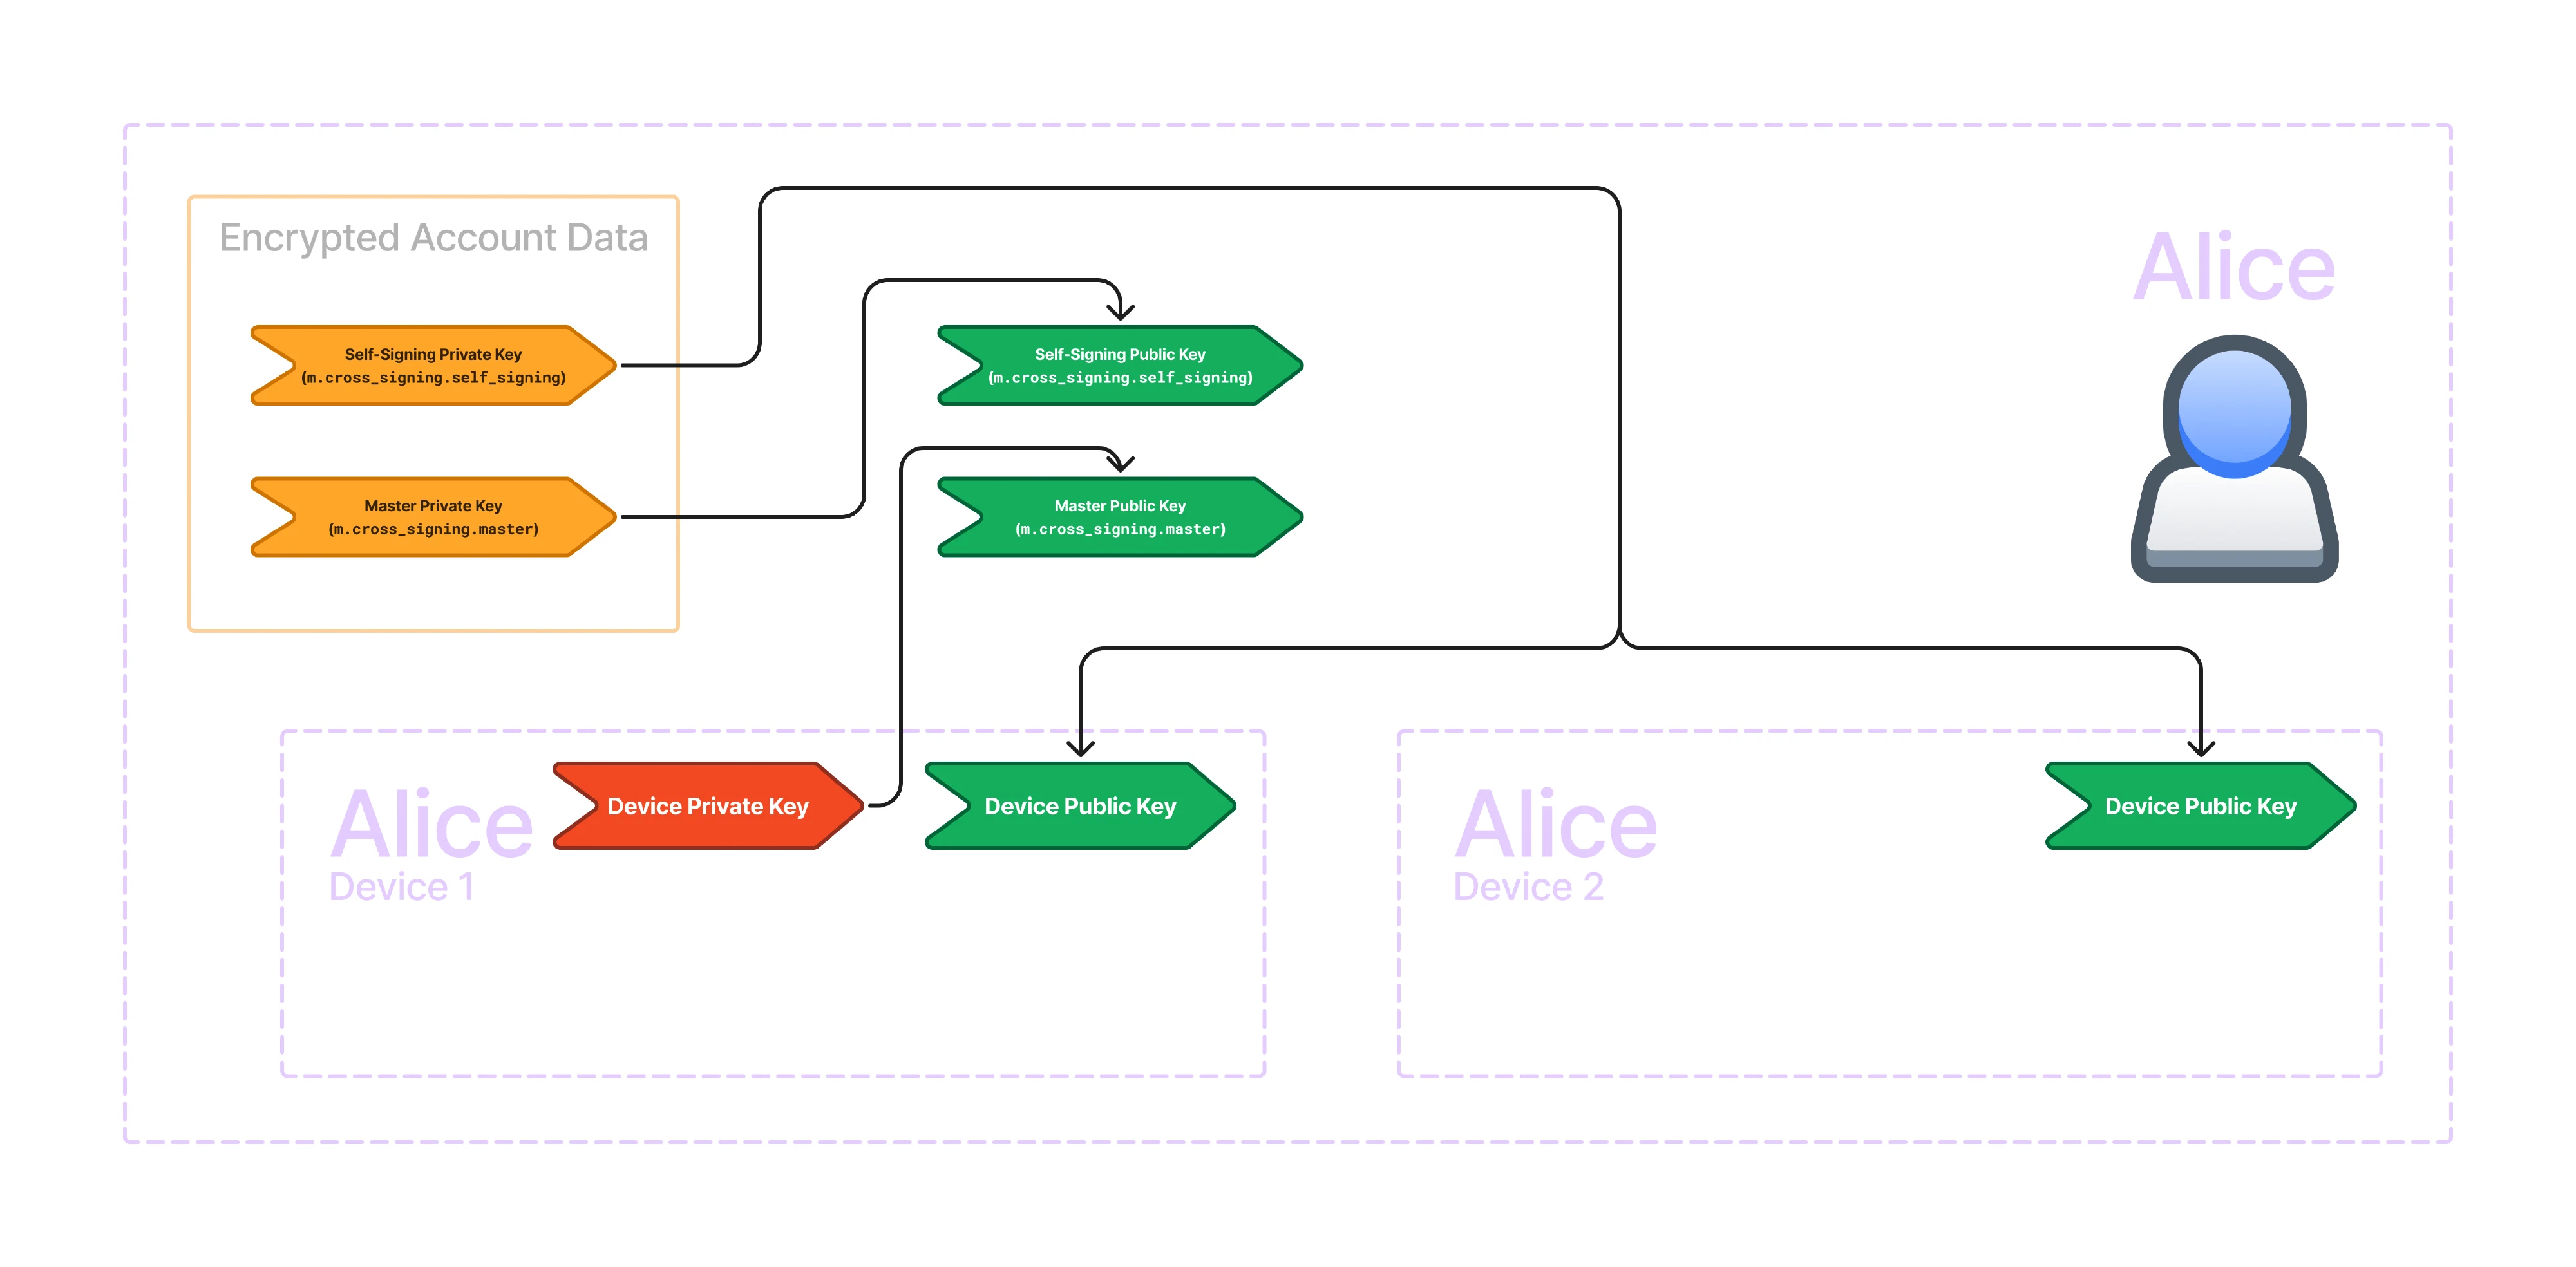
In Matrix, each device has a device keypair. The public key is an identifier for the device. To verify a device, we sign the device public key. Often, we call this process trusting a key. We trust the key by creating a signature for it.
We can use our own device private key to directly trust the other device key. But that is inconvenient. When we log in a new device, all our existing devices will need to make a signature for the new device, and the new device will have to make a signature for all the existing devices!
So, we introduce a new user-wide key called the self-signing key because it signs our own devices. We use the self-signing key to sign the device keys but how do we know if we should trust the self-signing key?
That’s where the master key comes in. The master key signs the self-signing key. We then trust the master key by signing it with our device private key.
This creates a chain of trust. The device private key signs the master public key which corresponds to the master private key. The master private key signs the self-signing public key which corresponds to the self-signing private key. And the self-signing private key signs all of the device public keys.
This allows us to trust a single key (in this case, the master key) and then by verifying the signatures along the chain of trust, we can trust all of our own devices.
User Verification
Sometimes, we want to trust a user so that we know that all of the devices on their account are under their control. If a new device is logged in, we will know if they control the device if they have signed it. If some malicious actor logged in a new device, they would not be able to sign it, and we would know the other user has been compromised.
The user we want to trust has already signed their devices with their self-signing key, which is itself signed by their master key. So, if we are able to trust their master key, we will have a chain of trust to all of their devices. In the following diagram, I’ve highlighted all of the signatures required for verifying another user’s devices.
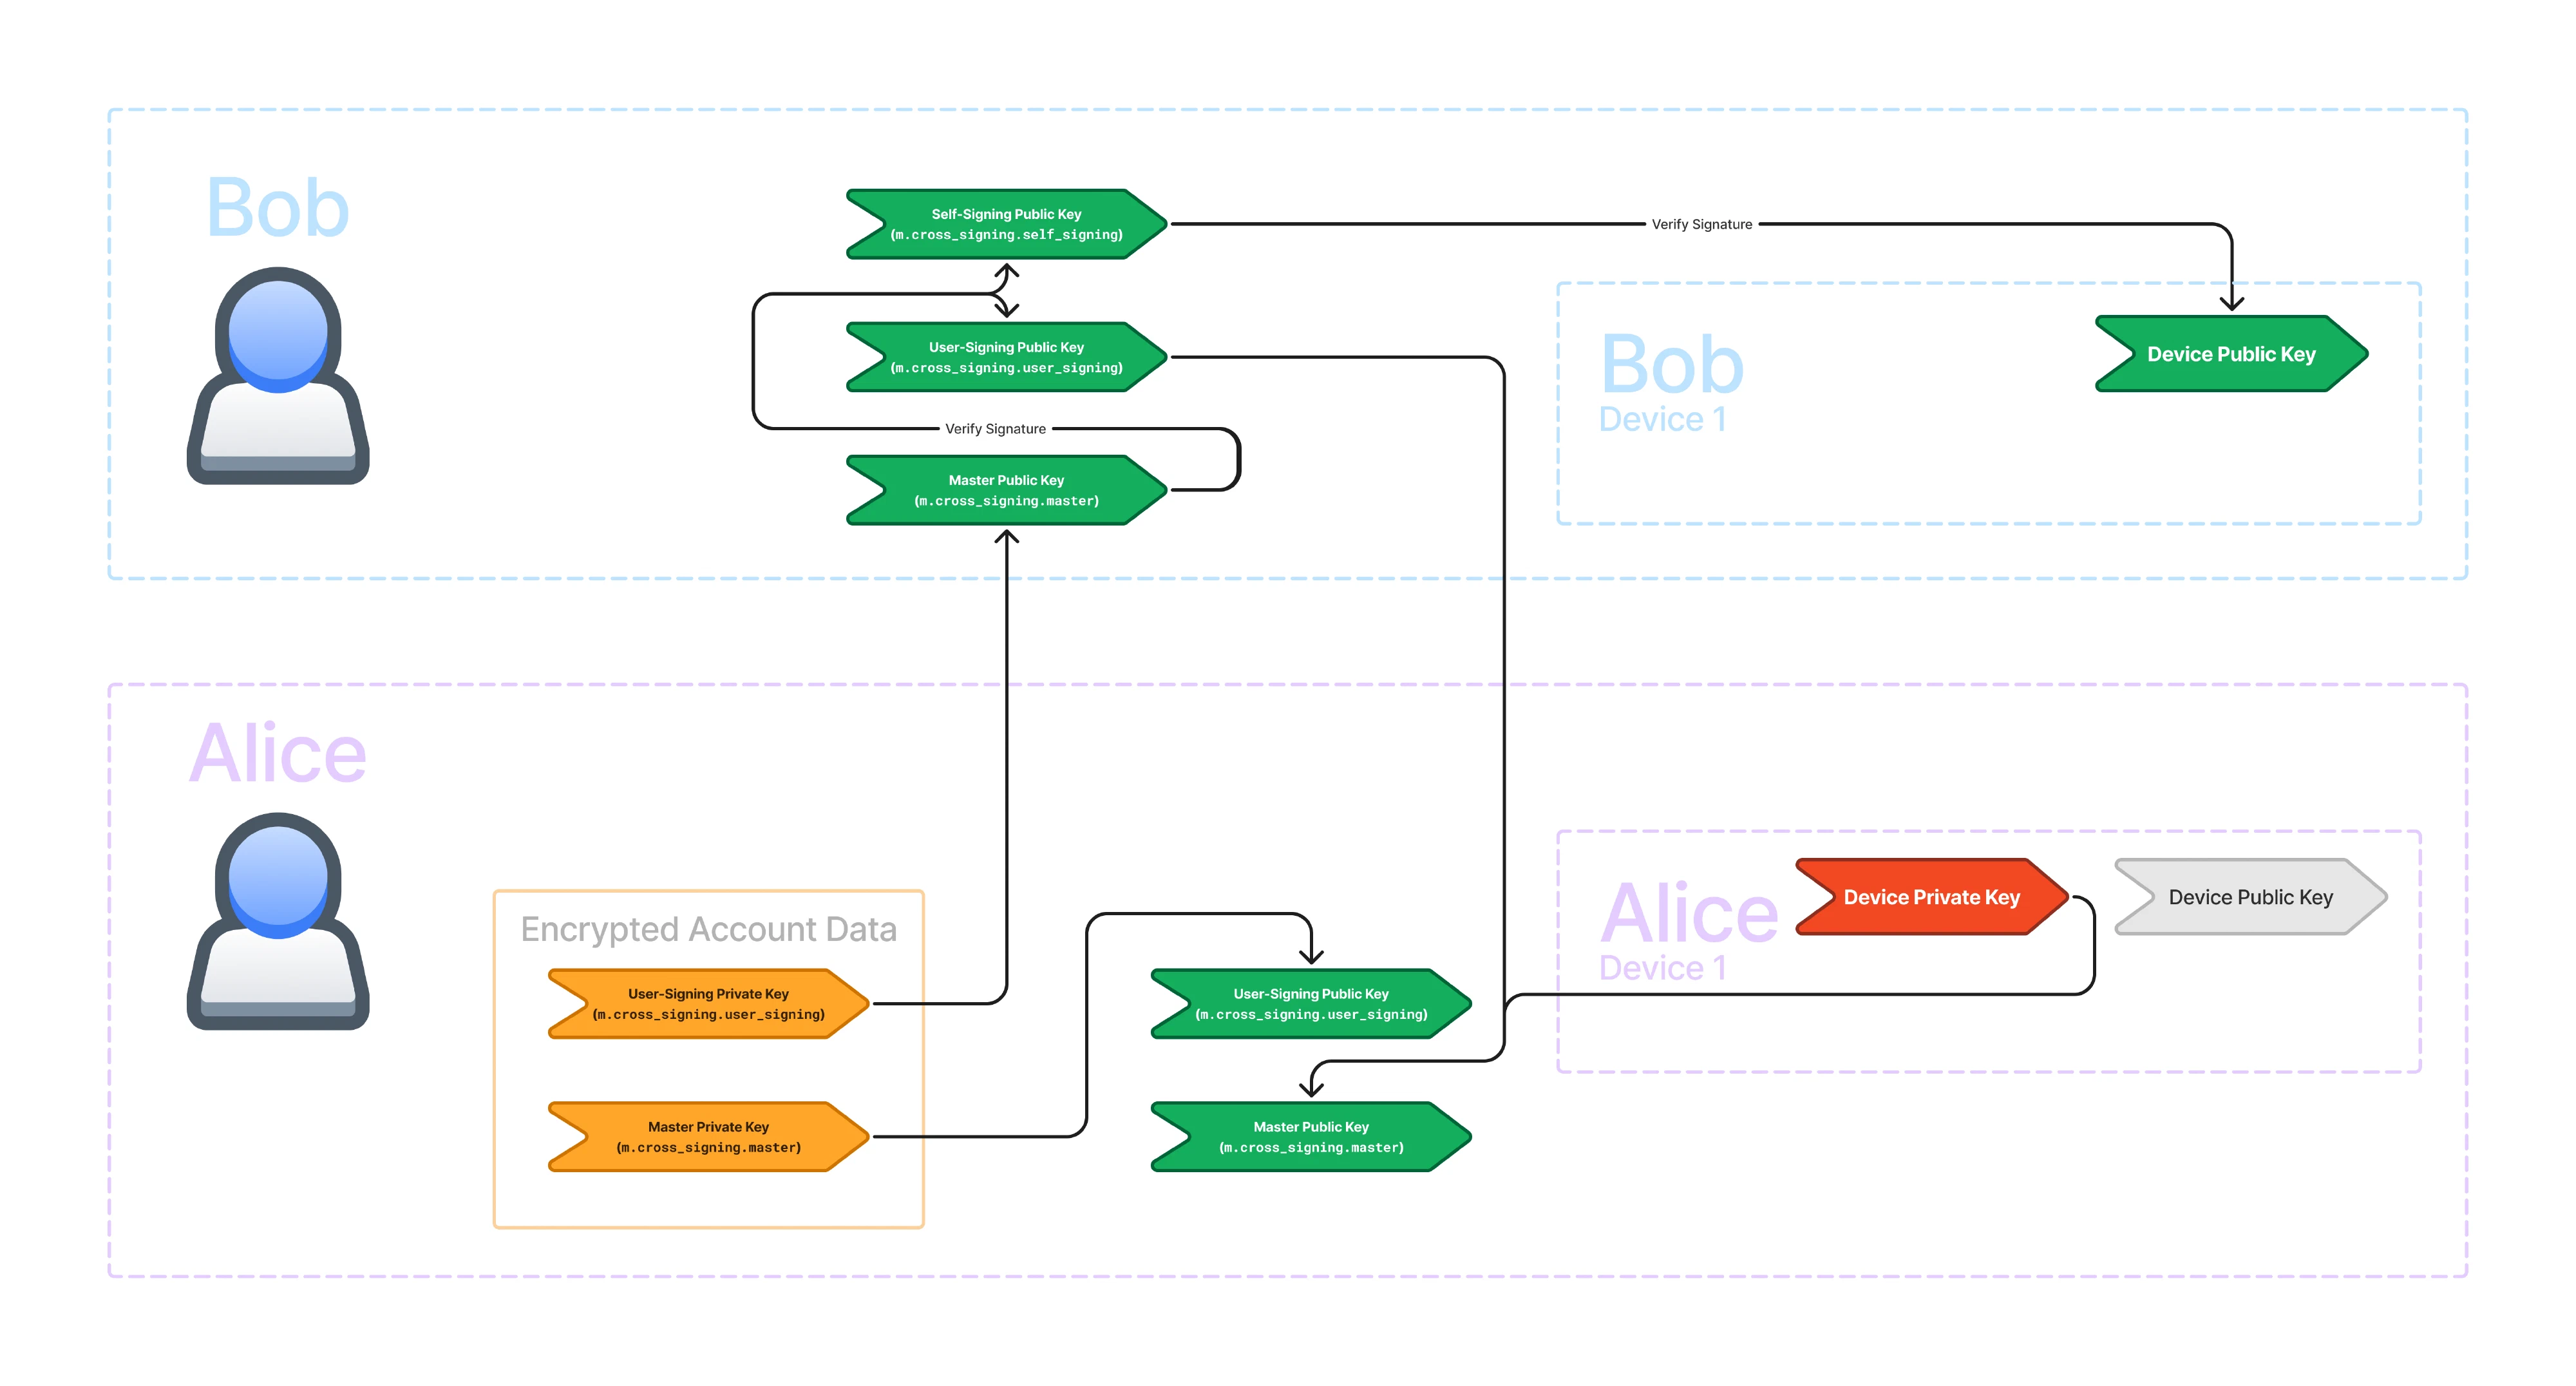
We introduce a new key called the user-signing key which signs other users' master keys} and is itself signed by our own master key.
This creates yet another chain of trust. Our device private key signs the master public key which corresponds to the master private key. The master private key signs the user-signing public key which corresponds to the user-signing private key. The user-signing private key signs other users' master public keys.
We can verify the signatures by the other user’s master private key using their master public key. Since their master private key signed their self-signing public key, we can verify the signature and trust their self-signing key. Since their self-signing private key signed their device public keys, we can verify the signatures and trust their device keys.
Secure Secret Storage and Sharing (SSSS)
Wow, that’s a lot of keys! Where are they stored? The public keys can be stored on the server. However, the private keys need to remain in the user’s control. So far we have seen private keys for key backup, user signing, and device signing as well as the master key. These keys are stored on each of your devices and can be shared with your other verified devices using those Olm-encrypted to-device events. But what if you sign out of all of your devices or lose access to them?
That’s where Secure Secret Storage and Sharing (also known as SSSS or quadruple S) comes in. SSSS allows you to store your keys encrypted within account data on the server. The following diagram shows SSSS.
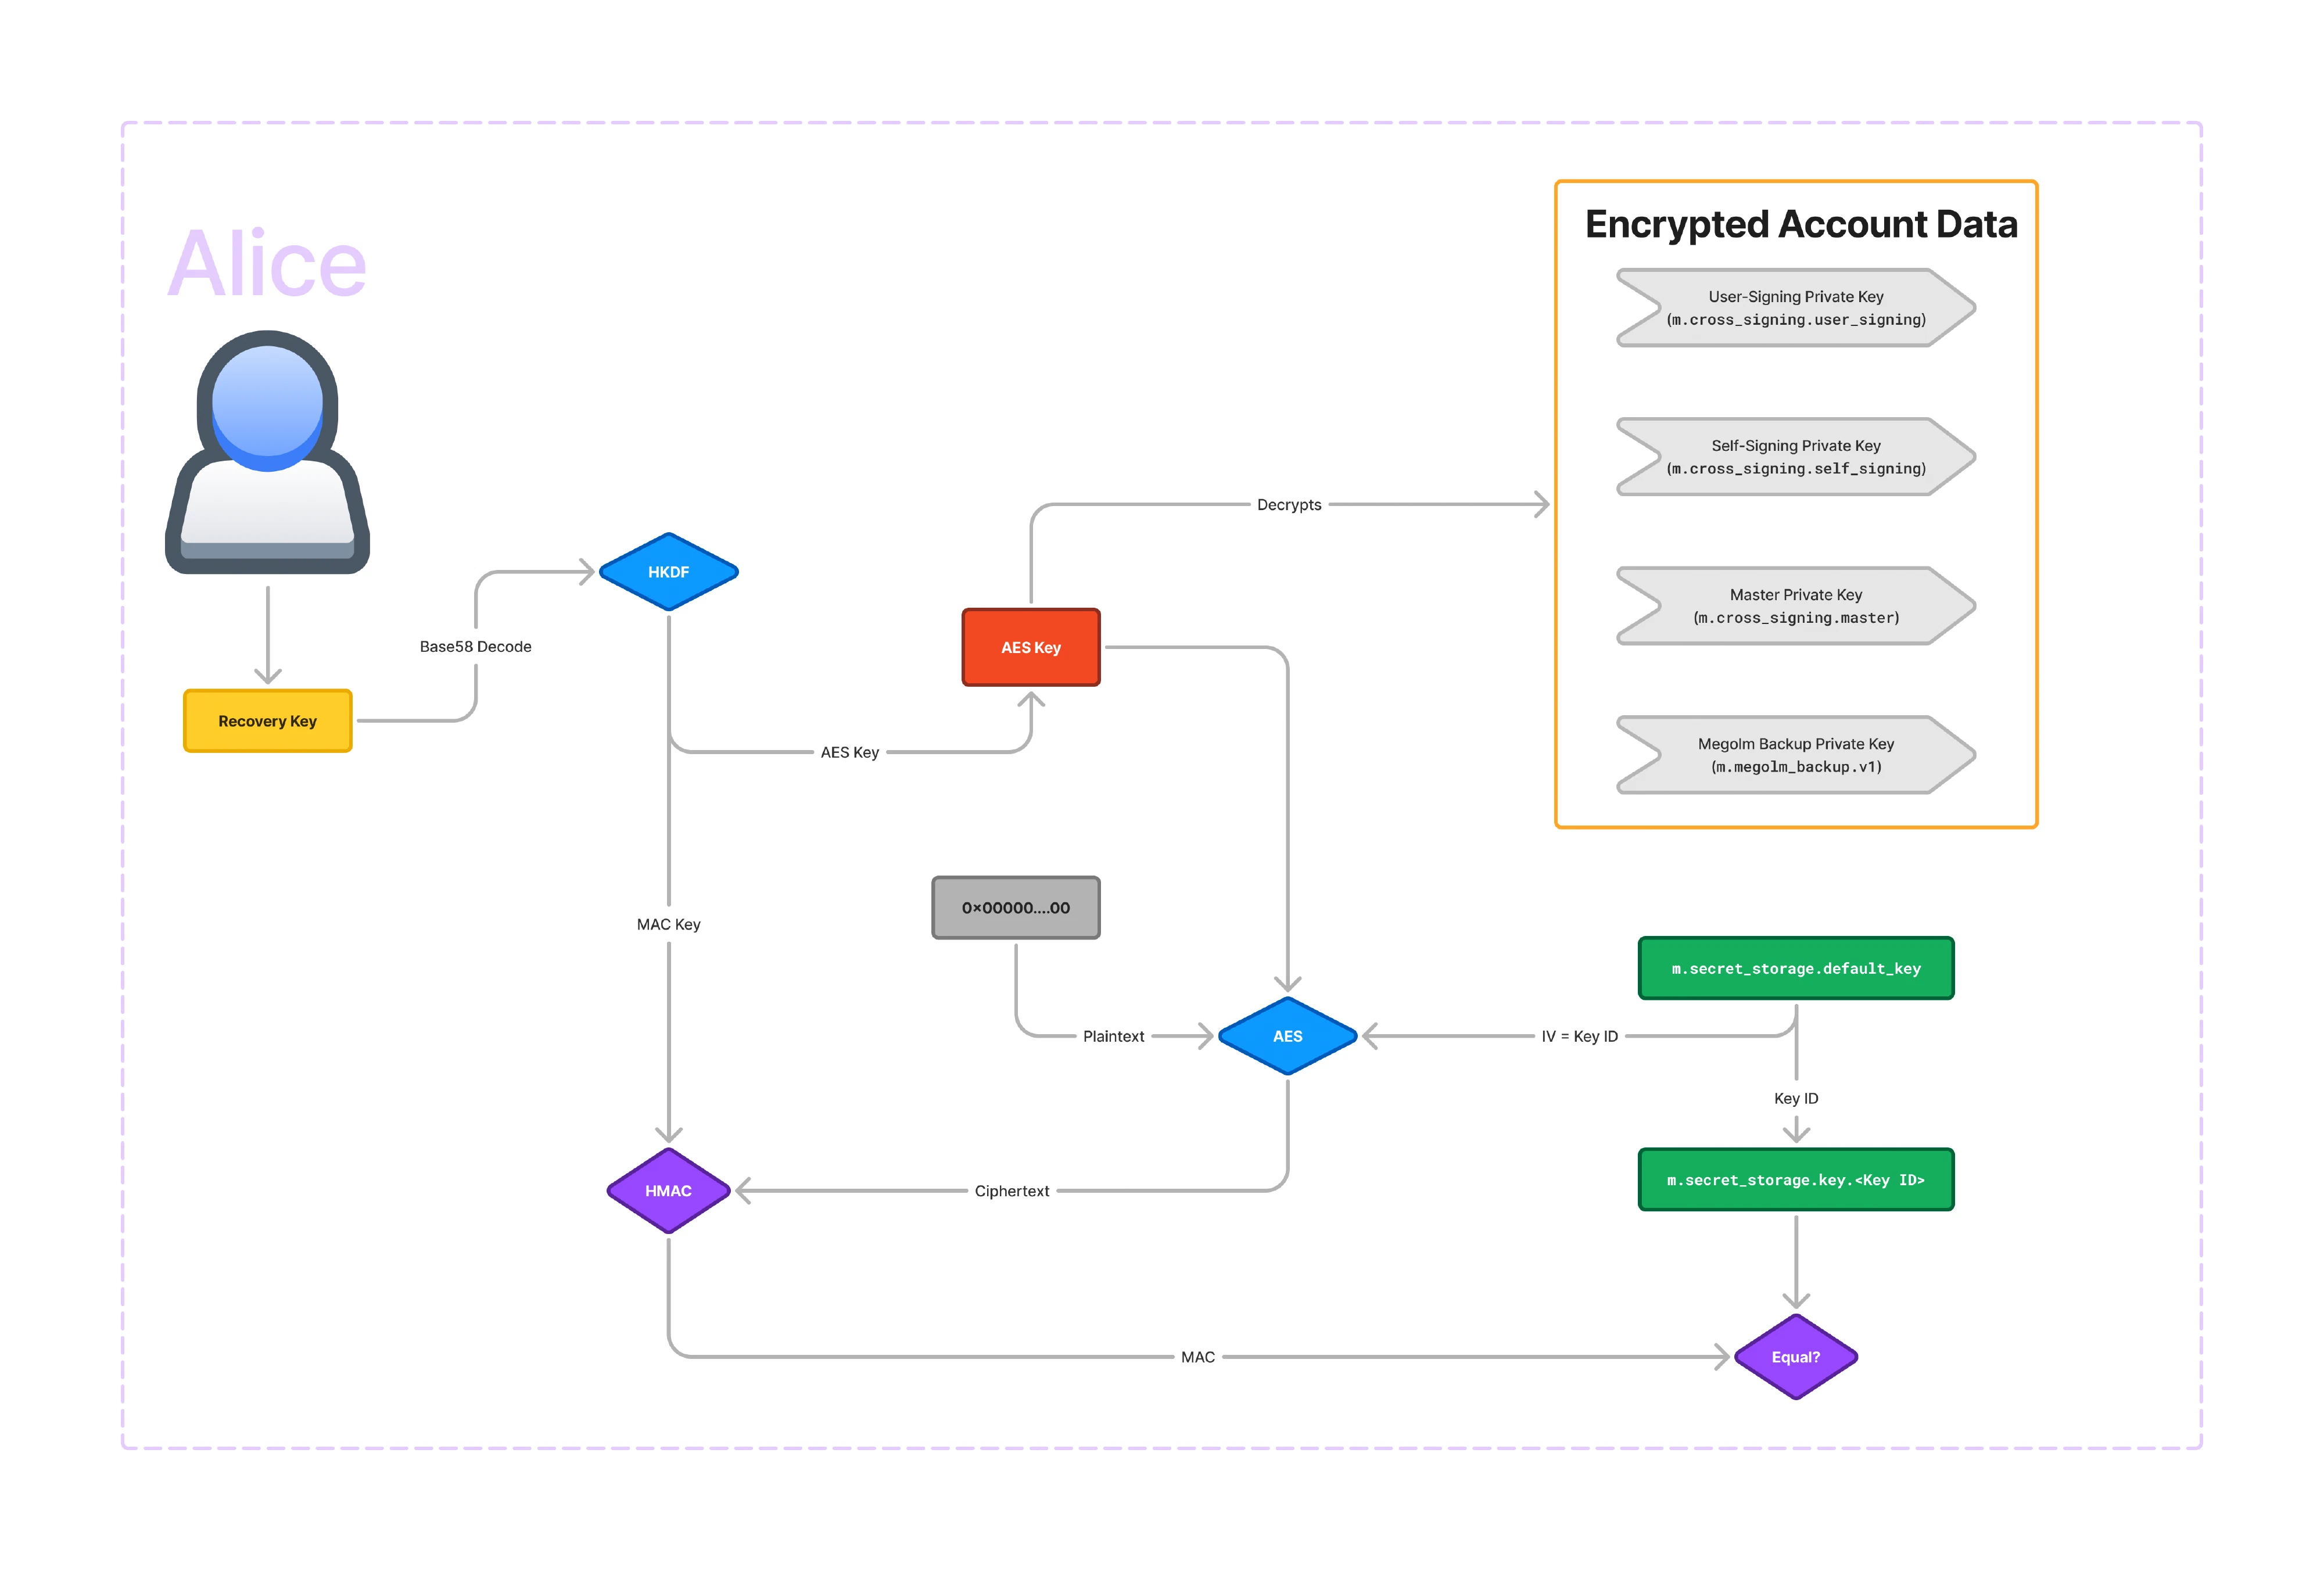
The key that SSSS uses to encrypt the account data is effectively the recovery key. There is a base58-decode and an HKDF transformation which produces the actual AES key, but it’s basically just your recovery key that unlocks the encrypted account data.
You can probably see that if you lose your recovery key, and you have no signed-in devices, there is no way to recover the private keys. This is why it’s important to store the recovery key in a safe place like a password manager.
Astute readers may realise that AES needs both a key and IV and I’ve only described how the key is generated. The answer is that the IV is stored within the account data object itself.
So what’s going on in the bottom part of the diagram? It’s not actually strictly
necessary for the encryption, but it allows you to verify that your recovery key
is correct before trying to decrypt account data. The core of this functionality
is an equality check between an HMAC call and the HMAC stored within an
unencrypted account data event m.secret_storage.key.<Key ID>. There can be
multiple key IDs, so the default Key ID is stored in
m.secret_storage.default_key. The base58-decoded recovery key is passed
through HKDF do generate an AES key as well as a MAC key. Then, using 32-bytes
of 0s as the plaintext, and using the key ID as the IV, we run AES. Then we take
the ciphertext and use that as the input to HMAC. This process acts as a
checksum for the recovery key: only if the recovery key is entered correctly
will the MACs match.
Conclusion
Let’s go back to the big picture once more and see what we have learned.
We’ve now discussed each piece of this diagram. We discussed the Megolm session which gets shared via Olm-encrypted to-device events and to our own devices using key backup. We looked at how we verify our own devices using the self-signing key and how we verify other users using the user-signing key. We saw how the master key signs both the self-signing and user-signing keys, and we examined how secrets can be stored securely in account data on the server encrypted by the recovery key.
I hope that this article has helped you understand how all of these keys fit together. My goal is to convince people that Matrix cryptography is not scary. It’s complex, but not inaccessible. If you have access to all of the underlying cryptography primitives, all of this is something that a security-conscious programmer could implement. You almost certainly should not implement the cryptography primitives yourself, but composing them together is doable.
I documented this behaviour in matrix-org/matrix-spec#1712. ↩︎